AO1
Contextual Understanding.
Develop ideas through sustained and focused investigations informed by contextual and other sources, demonstrating analytical and critical understanding.
|
This is a brainstorm of various things that I could do in order to portray my theme which is identity through landscape and the different places that I could visit which relate to the theme. Although it may seem ambiguous, it sums up the main ideas for what I will depict. The first few ideas that had come to mind straight away were things such as cultural places and home towns, from this I got other ideas such as social statuses as different hierarchies live in different places and the area in which they live is two worlds apart. |

|
|
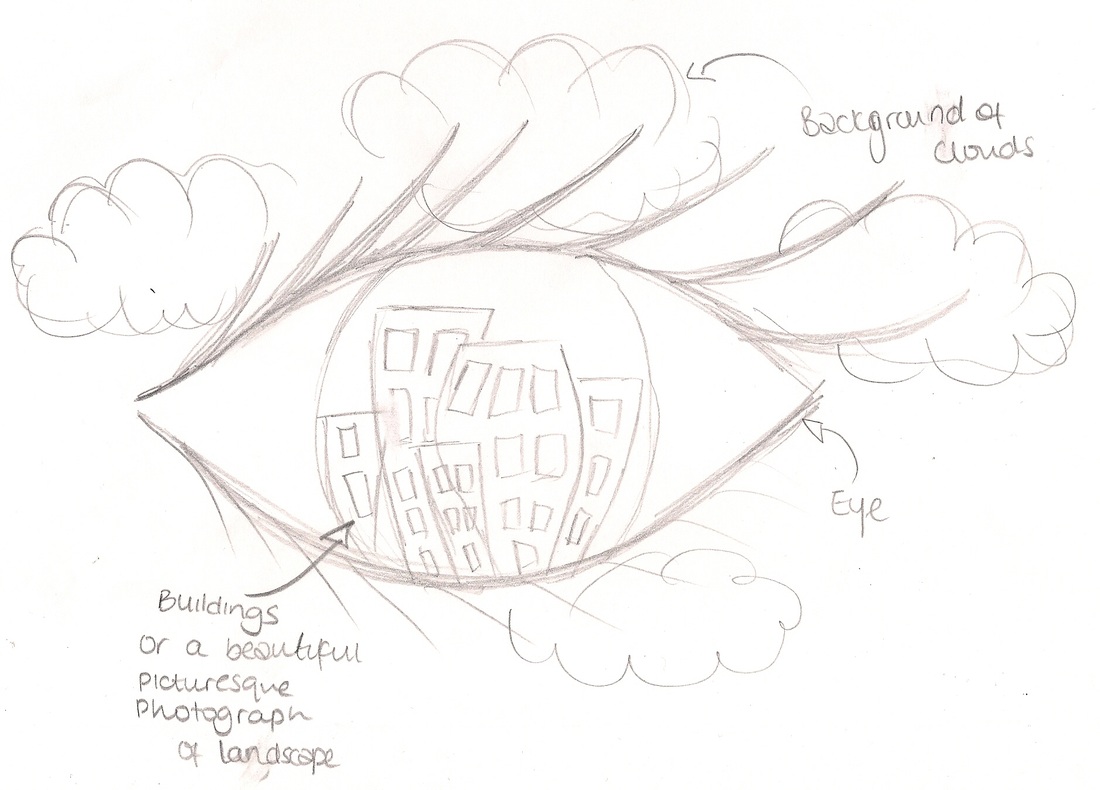
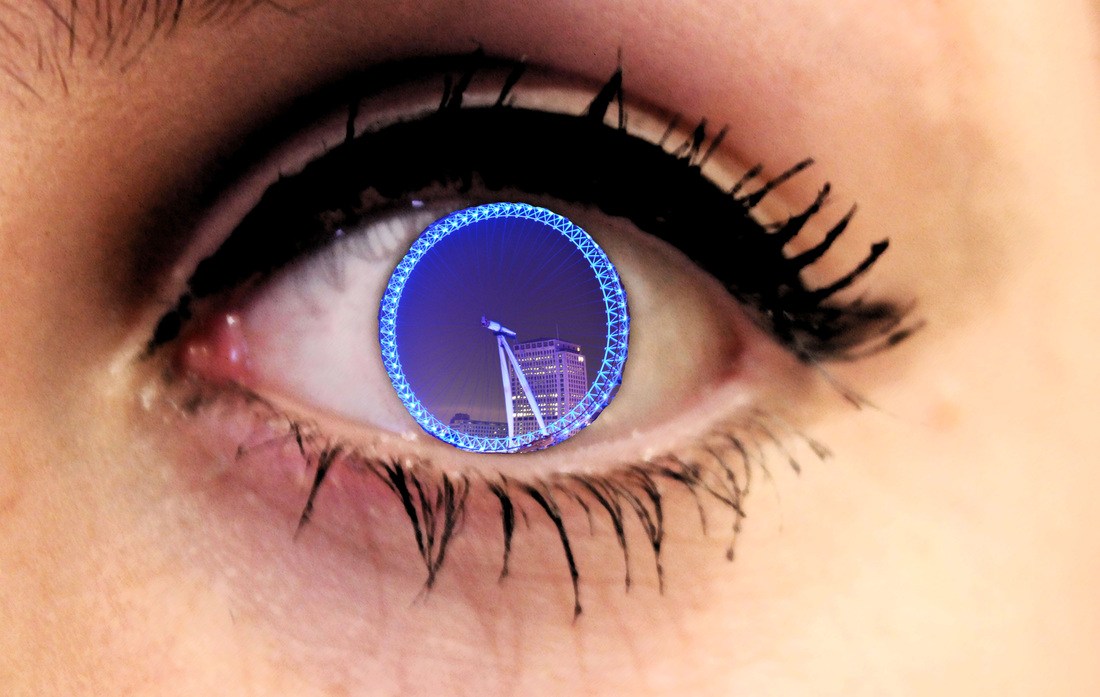
My first idea sheet is of an eye, the interior of the eye has a 3D photograph of buildings and the background is all clouds. Ulelsmann is a main inspiration to this piece. This relates to my theme as it consists of a body part, well a feature of the face you could interpret this as this is how someone views the world, or what someone desires their world to be or just in general, how they view the world itself. |
|
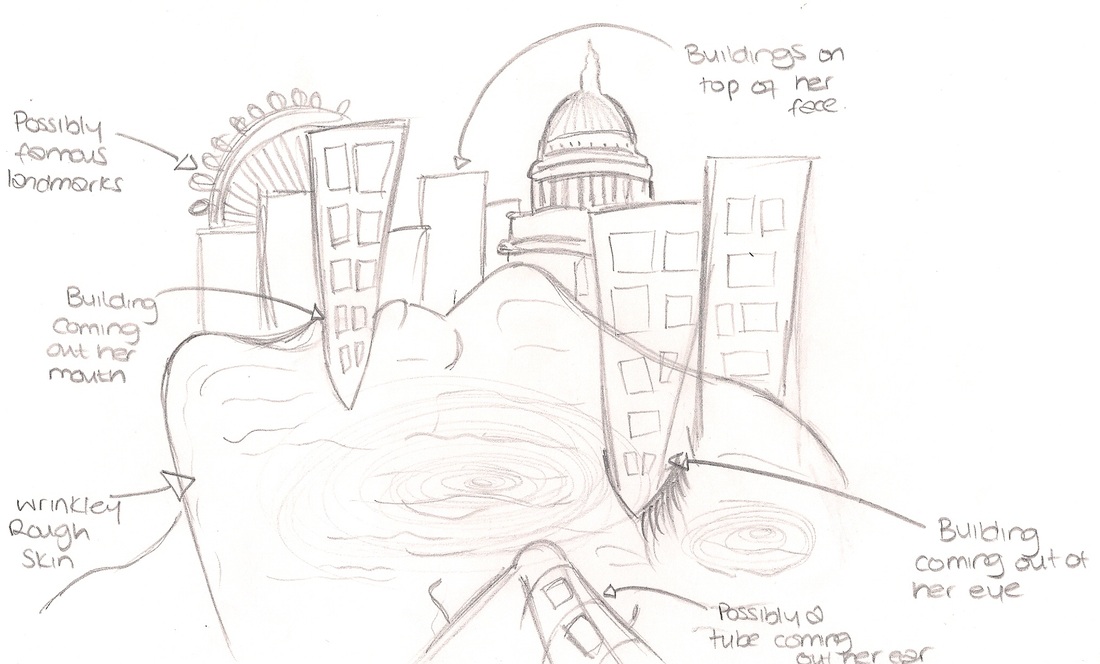
My second idea sheet is of a side view of a person lying down with buildings laying on top of the face. Some buildings are also growing out of certain places such as the models eye and mouth. I want the skin of the model to be wrinkly or maybe quite rough. This photograph may be considered quite surreal yet captivating and eerie. Again, the photographer Ulelsmann inspired me. |
|
|
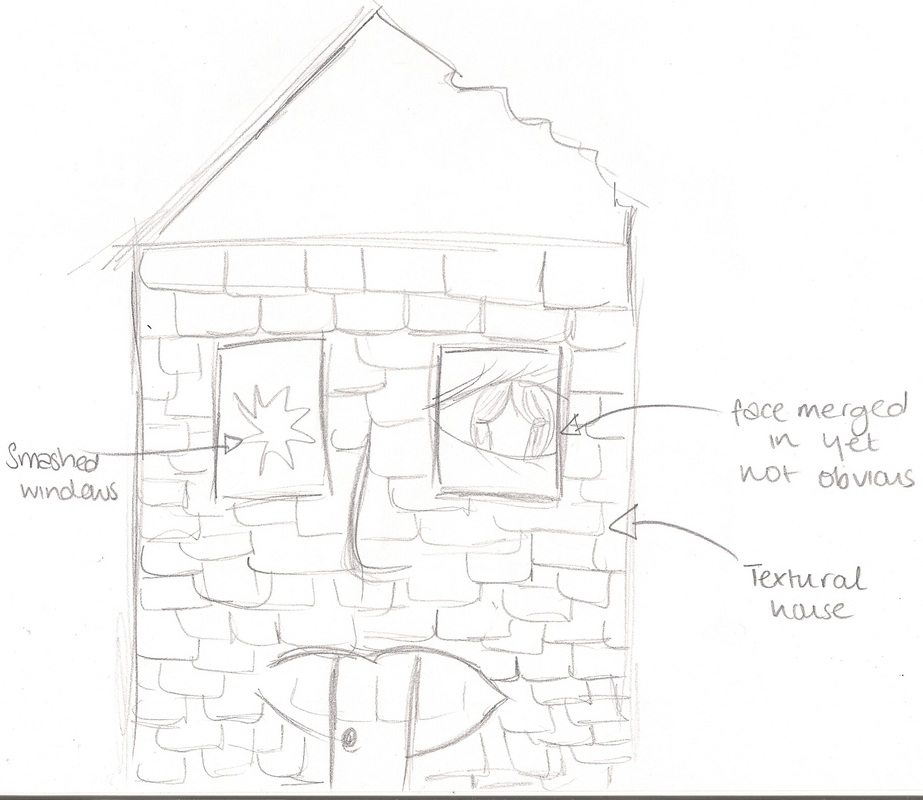
My third idea sheet is of an old house that has been slowly decaying and that is destroyed. The components that make up a house are instead altered as facial features. This makes it seem as if the house is alive and real. The reason for this is because people grow up and I want to portray this however, I had to fit it in with the concept of having landscape and so by merging a face in to a building, it also becomes surreal. Also there is fingerprints on the bricks which represents identity. |
|
holiday postcards
|
Eugene Atget
|
My own work above.
|
|
Eugene Atget was a French photographer born in Linbourne 1857. He has a range of landscape photography in Paris. He uses monotones, these being sepia and grayscale. All of his photographs consist of vantage point as he went to take pictures at a certain time of the day in order to achieve his intentions. He went early morning so that the streets are clear of people which focuses on the buildings or streets. His photographs are all desserted and it makes them mysterious, of an obscure nature. Atget captures a totally different side to Paris that people haven't seen, his subject was old Paris and the suburbs. Paris is known for being very beautiful and picturesque. Atget is unique as he has captured the back roads of Paris, the desolate side and this might be reflective to his personality, you could interpret that he might be a introvert person.
Jerry N. Uelsmann
|
John N. Ulelsmann was an American photographer born in Detroit. All of his photographs are surreal, he has used a photo software in order to manipulate these to enhance the effect of the photographs. His photographs are all in grayscale, this brings out the shadows and the contrasts within each photograph. The reason for which I have chosen him is because he is an inspirational photographer and his photographs are captivating. They all seem to have a story behind them and you can interpret them in different ways. You can make your own stories from them and the surrealism gives you that freedom. He takes photographs of landscapes and natural forms and combines them with things such as people and this relates to my theme which is identity as people are an obvious aspect of identity.
|
|
His photographs are controversial; an example of one is where he has a man-made house combined to the roots of a tree. Although that photo is not as complex as the others, it is still very effective. There is an eccentric feel to his photographs. Ulelsmann captures beauty and makes it absurd yet still beautiful. Ulelsmann gives you that freedom to interpret his photos how you want but to an extent. It is obvious as to what the photographs are but there is no specific story behind any of them, you can make your own story and meaning for each photograph.
Ulelsmanns' photography has inspired me and his photographs have a very in depth insight as to the meaning of each one. His photographs have a touch of simplicity and he has the ability to make them complex yet leave it quite subtle. All of his photographs are dream like.
Eugene Atget and John N. Ulelsmann have a few similarities within their photographs. One of these being that both of their photographs are in grayscale which brings out the shadows. Both of their photographs are surreal however, Atget surrealism is minor, it isn't as obvious. The reason for this is because every photograph is deserted which gives is a surrealist feel. Uelsman on the other hand has extremely surrealist photographs, they are definitely out of this world. Similar to Atget, the black and white photography draws attention to the shadows within each individualistic photograph.
AO2
Creative Making.
Experiment with and select appropriate resources , media,materials ,techniques and processes , reviewing and refining their ideas as the work develops.
Portrait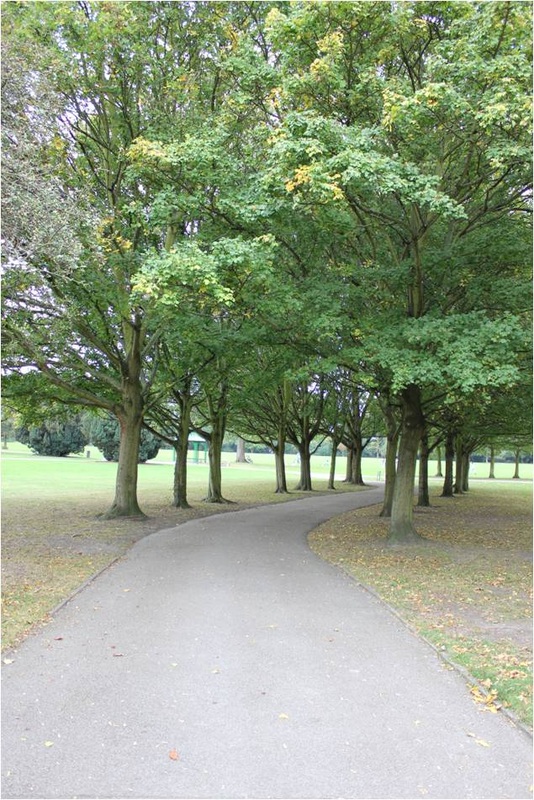 Portrait is a setting in which lets you focus on one main subject. It has a narrow depth of field. |
Landscape The setting landscape has a slow shutter allowing you to capture everything intended which also includes a large depth of field. Bulb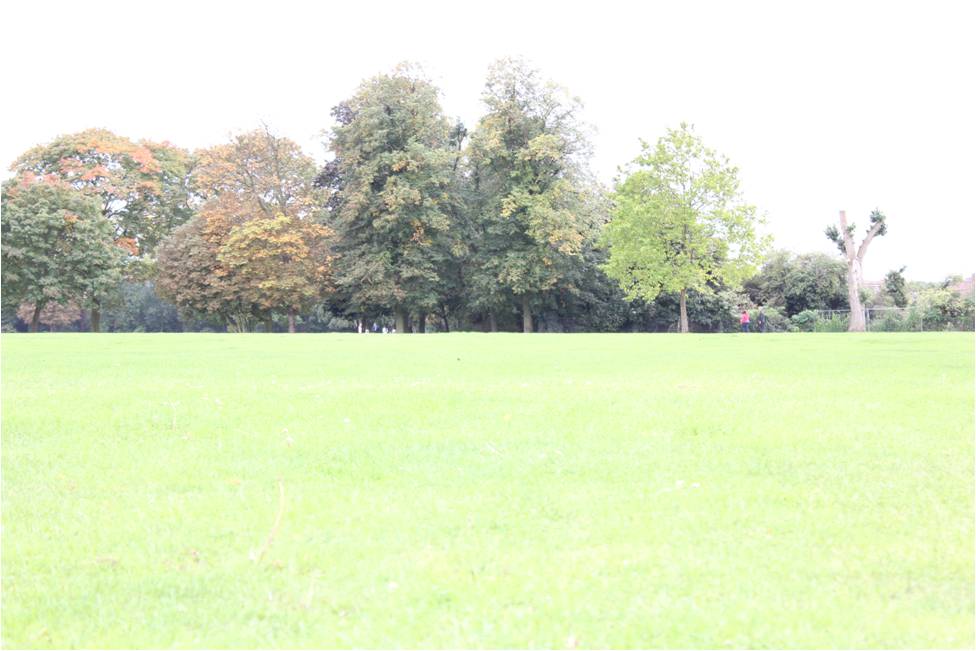 Bulb, abbreviated as B is when you keep the shutter open for as long as you think is needed and the result in the end is, getting light in giving it as much exposure as possible. |
Panning

Panning is a photography technique in which the camera follows a moving subject.
The subject is sharp and clear, while the background is blurred, giving a sense of motion
to the photo. You have to use the running man setting in order to achieve this.
The subject is sharp and clear, while the background is blurred, giving a sense of motion
to the photo. You have to use the running man setting in order to achieve this.
|
|
Shutter Speed.Shutter speed is the amount of time you keep your shutter open, this determines how much exposure you would like in your pictures. If you don't keep the shutter open for a long period of time, you do not get much light that comes in and this results in getting darker photographs which is called, having a low exposure although, if you were to keep the shutter open for long, you would get high exposure, sometimes if you keep it open to long, you get too much light in and the photographs may look over exposed. Furthermore, you can get fast and slow shutter speed,
|
Lighting.
When there is light in the background, the subject tends to become a silhouette as it is back-lit. To avoid this, you have to either use fill in light or the auto exposure lock, abbreviated as AEL. Fill-in light is when it makes the subject and background both brighter, giving it much more exposure. AEL is when you take a metering of the subject, this is done by placing the camera close to the object, keeping hold of the button and then taking a picture. The effect of using this is that it takes a note of the lighting on the subject and it keeps the background subtle.
|
|
|
|
Aperture. Here, is a series of pictures with different lighting experimenting with different settings and changing the f-stop. This result of this is that each picture was different from the next. The lighting in each picture gets brighter and the end few pictures are over exposed. By changing the aperture settings, you get different amount of light ranging from f/1.4 which let's in quite a bit of light from f/16 which doesn't let in as much.
|
The Six Rules of Photography.
|
|
One - Framing the subjectThis is a technique used to draw attention to the subject. Compositional framing consists of natural or man-made objects within the photo itself. The first photograph has an natural frame, this being the tree. The tree is also a silhouette which was deliberate as is brings about the subject in the middle out more.
|
Two - Filling the frameThis is a technique you use to make it look more effective. You take out all unwanted information and focus on the main thing by having a close up of it. By getting in close and zooming in, you can capture emotion and make the picture have much more meaning than having dead space around it.
|
|
|
|
Three - Vantage pointVantage point is simply the best position of a point of view. It is very important as the viewpoint of photographs can change the meaning and can be conveyed in various ways. You change the vantage point by standing on top of something, crouching down, manipulating the picture by a forced perspective. On one of my pictures, the model looks as if he is pushing the the building, this is a forced perspective as in reality, the building is 10x bigger. The other picture of the building was succeeded by me crouching down, the perspective makes the building look superior and much more taller than what it really is.
|
Four - Depth of fieldDepth of field is simply the amount of focus on the subject. There are two main techniques, shallow depth or field which means only the subject is in focus, the unnecessary information in the background is blurred. The other technique is large depth of field, this is when everything is in focus and everything looks sharp. Shallow depth of field requires a large aperture, this being f/1.4 or f/2.8. Whereas , to take a large depth of field, you need a small aperture like f/22 or f/16. With a compact camera, you cannot use settings such as aperture and so depth of field is more difficult achieve, you can try zooming in to the subject. You feel like you can grab it.
|
|
|
|
Five - Use of LineUse of line helps to create a mood and leads the eye through the photograph to the main subject. When dealing with lines, the subject can be broken into the following types: Horizontal, Vertical and Diagonal. Horizontal lines create a sense of stillness, as if it's all frozen. Vertical lines create a sense stability, peace and tranquillity and Diagonal lines create a sense of movement and action.
|
Six - Rule of ThirdsThis is simply a guideline that helps photographers to frame and compose photographs so that the final outcome is balanced. It tends to draw attention to the subject and the lines fall in to place as to where everything is. You have to divide the picture in to 3 lines vertically and horizontally.
|
|
Photoshop
Using Photoshop to enhance depth of field. By using the blur tool on Photoshop which is shaped as a tear-drop, you can enhance a photo and create depth of field. By doing this, the picture looks 3D, as if you can grab it which makes the photograph a lot more effective.
|
|
AO3
Reflecting Recording.
Record in visual and/or other forms ideas ,observations and insights relevant to their intentions,demonstrating an ability to reflect on their work and progress.
Photo shoots
One.
My first photo-shoot took place in Bank located in London. The reason for this is that my main intentions were to capture a variety of significant buildings, a differentiation of structure and texture for each individual building and also to capture striking scenery. I had accomplished this by exploring from different heights, in other words, going to the top of a shopping centre so that I could capture a picturesque view however, my attempt of doing so wasn’t as good as I had believed it to be, the time of day and change in weather had changed the mood and setting of its surroundings. The need of trying to capture a consecutive number of buildings in one photograph wasn’t successful as it was all too far away and close up photographs are more appealing.
Furthermore, another weakness with that is that the lighting is varied; some photographs seemed to be over exposed making the sky look white instead of its original colour. I based my photographs around idea sheet one and three which involved merging and cutting buildings in to a photograph. I took photographs of different places in Bank as it all changed in places. Elaborating on this idea, I came to a more surrealist idea which is to photograph hallways and alleyways; I thought of this as you could interpret that people are constantly trying to figure their identity out. Hallways tend to normally be quite narrow and long, although it isn’t a never ending, you could say that throughout their life, people who are trying to figure out who they are normally hit a point which is the end and they finally feel as if they have find themselves. I believe that the close up building photographs were more successful than my full landscape ones as they were more appealing.
Two.
|
Here is a series of photographs of a model, my intentions were to manipulate her face in to my landscape photography. I don't want to make her the main focus of the photograph however, my idea involves her. I want a surreal Ulelsmann inspired piece and he uses models in his photographs to enhance it and this makes it a lot more effective. I have tried many different ways of manipulating her on Photoshop and by doing so, the ideas for my photography grew. At first, I was going to use her face and leave it looking subtle and simple merged in to a building however, now I want to make it much more surreal and this is due to my inspiration from Ulelsmann. The pictures of my model lying on her side with her mouth open is contribution towards my experimentation.
|
|
I want to build a town/city on her face and I want the buildings to look as if it is going to grow out of her mouth. I believe that the photographs of my model lying on her side is succesful as I captured what I needed however, the lighting may be improved, I took photographs with and without flash and it resulted in complete different coloured backgrounds. The first few photographs were taken in a green room, these photographs were experiments as well as possible final piece ideas. I changed the aperture as the photographs were extremely dark at first.
Three.
I went in to London and took more photographs of famous landmarks as they are significant and although, they may seem postcard like, these are the places that make London and that makes individuals identity. The reason for which I went there is to portray different parts and see a contrasts in London. Also, for my final piece, I had decided to take on idea sheet two and I believe that having these places will complete the photograph. Instead of building a town on my models face, I decided to make it a city and have iconic buildings and attractions. Even more, I also decided to stick to idea sheet one with the eye but vary it. I stayed at London till evening as it looks much more picturesque during the evening, I took numerous photographs of the London eye as I wanted to insert this in to my models eye. I came across a few difficulties with
taking photographs in the evening as the photographs came out blurry. I then placed the camera on a tripod to ensure the stillness and avoid camera jog. The photographs during the day were quite successful, I have photographs of the Big Ben in different angles and I have various rules such as vantage point and rule of thirds.
Four.
Here are a few photographs of landscape photographs that I took in Bangkok. I believe that the majority of them were good however, it didn't fit my brief quite as well and so I will not use them towards my final piece. The reason for this is that they are not as strong as my other photo-shoots and I believe that I can do so much more with the others. These photographs portray much more cultural aspect which is good as Identity is to do with everything that makes you as a person. It goes under the debate of nature or nurture and all of this determines personality but some of these photographs do not give the same picturesque effect as the other do.
Five.
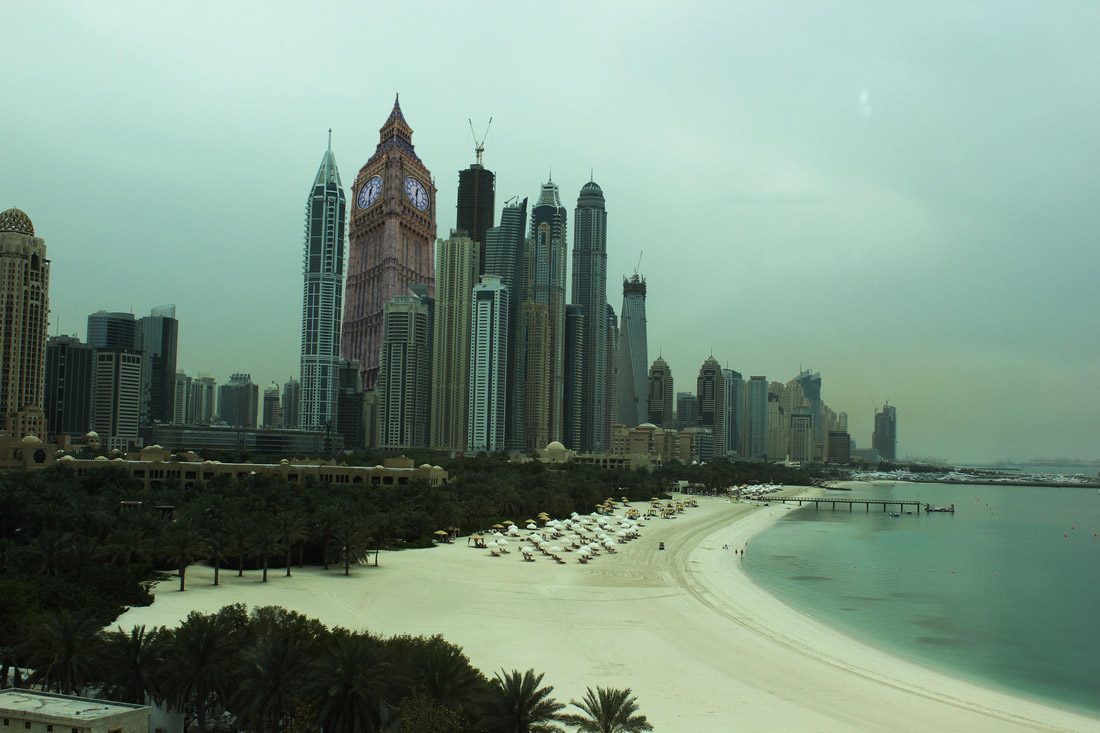
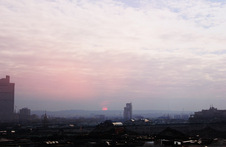
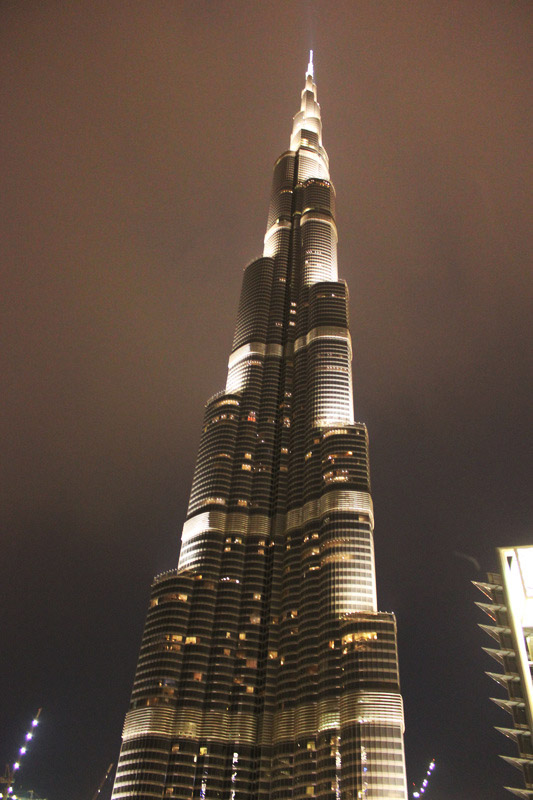
I went to Dubai and took photographs of the extravagant scenery. The reason for this is because I wanted to use the concept of taking sections of places and combining it in to one. This led me to think that I could combine cultural and physical aspects of London with Dubai purely because the photographs are more in depth than the Bangkok ones. I have captured various scenery at different timings in the day. Dubai itself is a picturesque country and my personal opinion is the different and vibrant colours represent the freedom of this growing economy and culture.
Photoshop Experimentation.
One.
|
|
Over here, I have used Photoshop to enhance my photographs. I am using Photoshop to re-create some of Ulelsmann’s photography with a touch of Atget in order to produce my very own artist style photographs. Both of their photographs have inspired me in various ways and I wish to have an input of their style in my work however, I do not want to replicate it. These photographs are just a representation of experimentation that I have devised on Photoshop so that I can improve my skills which will ensure that my final piece will be produce just how I have pictured it to be. The first few photographs weren’t good however, as I keep experimenting using different textures and effects on Photoshop, I saw the difference in improvement.
|
After doing so, I came to the conclusion that I needed buildings with much more texture than I had already captured. After doing a few more experiments on Photoshop, with actual buildings and not textures such as a tree trunk, the idea of merging a face in to building wasn’t quite fulfilling my objective and so I then started experimenting on having building in different forms with a face and I believe that this was much more successful. Photographs one and two were produced by simply just placing one on top of the other and changing the opacity, I had done this as I wanted to see whether I could make the texture stand out more than the face but, it did not look quite as effective. I then, got a rougher and rigid texture which was a tree trunk and instead of just changing the opacity, I changed the effect to hard light. The face is now more obvious nevertheless; it looks much more effective and gives he photograph much more meaning. You can interpret that this young model in photographs three and four can be a representation of how everyone grows up and how features change over time; the rough trunk texture can be seen as wrinkly skin.
The main concept of all my ideas were to use this models face to somehow relate and merge her in to my landscape photography, The reason for this is that everyone has their own identity and I wanted my photography to be more peculiar and surreal. For my final piece, I am going to stick with idea sheet 2 which is getting buildings and a landscape almost growing out of her face. I wish to achieve this by using Photoshop.
The main concept of all my ideas were to use this models face to somehow relate and merge her in to my landscape photography, The reason for this is that everyone has their own identity and I wanted my photography to be more peculiar and surreal. For my final piece, I am going to stick with idea sheet 2 which is getting buildings and a landscape almost growing out of her face. I wish to achieve this by using Photoshop.
Two.
|
|
The first essential step on Photoshop is to make the background a layer so that you can change things. I then changed the look of the eye as I wanted it to look bolder so I clicked on filter which had another link to brush strokes, within this, I clicked dark strokes. This changed the contrast and boldness, especially with the make-up on her eye. I changed the intensity of black and white to make it look subtle and then removed the iris using the quick selection tool. This tool allows you to select parts that are needed whereas the magic wand clicks where is assumes you want to remove. |
On the quick selection tool, you can use the plus (+) to add and minus (-) to remove if you have taken too of much of the picture, after selecting what you want, you click the backspace button on your keyboard and remove it. I then opened up another photograph of the London and went through the same process of making another layer, removing the unwanted parts and then dragging it in to the main photographs. After this, I re-sized it so that it fit the Iris and I warped the image to get a rounded off finish.
Three.
|
This photograph was slightly more complex to Photoshop than the one above. The process at the beginning is the same where you turn the background in to a layer. I first removed the background of the photograph with my model, she was the foundation of the photograph. I then opened up all the photographs that were going to be used for the final piece, removed the backgrounds on all photographs and then dragged and dropped the useful bits in to the final photograph. I then moved each layer around to see what looked best where. After doing this, I duplicated a few of the photographs. |
The reason for duplication is so that I can make silhouettes of each part and put it in the background as I believe that this would make the photograph look more effective, it enhanced the photograph. I made them silhouettes by making them all black and white and then playing with the brightness and contrast, to do this, you have to go to image at the top on the task bar and then go to adjustments. Finally, after placing everything, I imported a background.
Four.
|
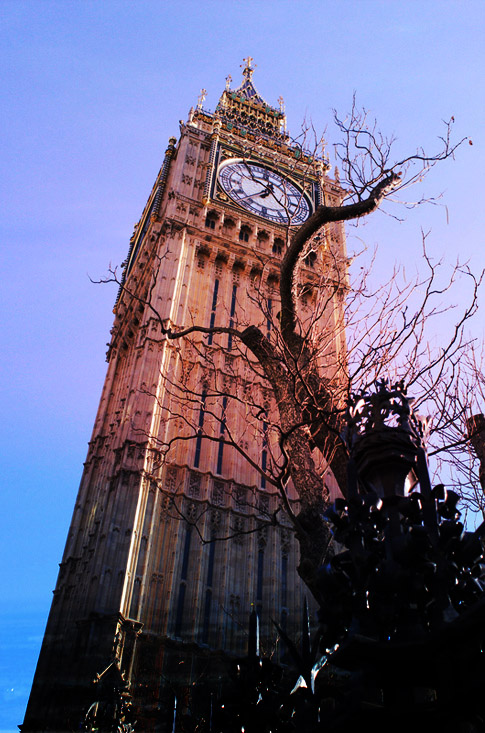
This is a picture of Big Ben, which through the use Photoshop I was able to blend in and therefore come up with a unique and vibrant effect.
A full explanation of my process is here: 1) I unlocked the background and made it into a layer 2) I then placed the picture of the Big Ben on top and cropped it 3) I then changed the settings to "Hard light" |
|
|
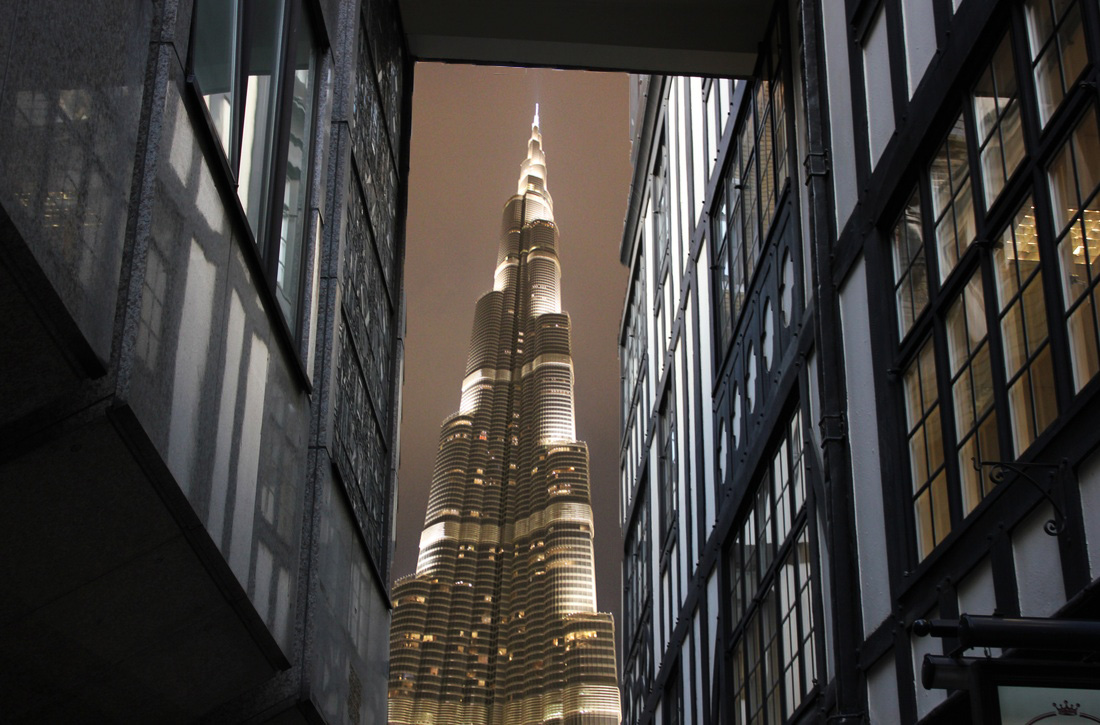
In this photo I changed the brightness and the contrast in order to create a futuristic and expansive feel, as this is the tallest building in the world. Then I changed the curves to create the feel of the building stretching off far into the sky, which I feel helped me create this photo.
|
The experimentation above lead me to changing my idea as I believe that my first idea of a city being built on my models face did not work out, it didn't look as effective. The photograph looked more fake than absurd and this was not my intention and so I had to tweak my idea slightly so that I can have a series of final pieces that portray what I had intended to from the beginning. I then started combining photographs of Dubai and London which inspired me to create and experiment in different ways. Due to this, the outcome is now much better and the integration between the two countries work very well. The reason I decided to combine them is because I wanted to portray the identity of more than one country and make it look surreal just like Ulesmann's photography.
Mock-Up.
One.
|
|
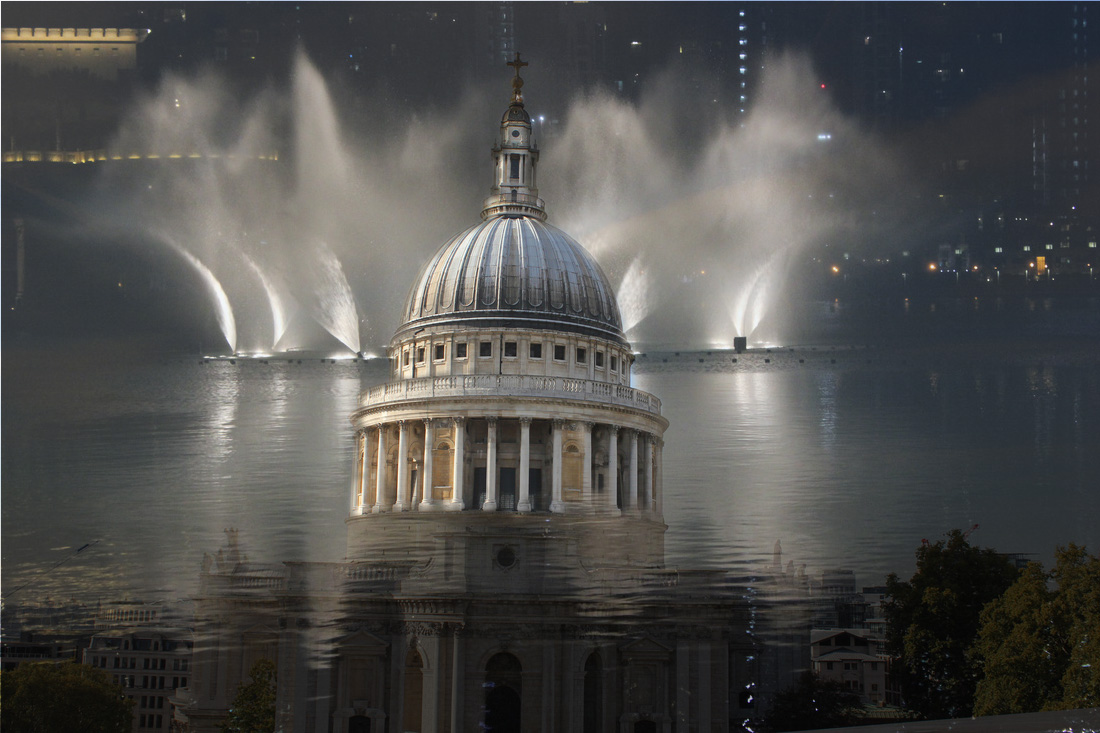
The first photograph I created towards my final piece is a photograph of St. Pauls sinking in water. The reason behind this was to create a sense of surrealism and I believe that I have done this. I took a photograph of Dubai fountains and St. Pauls Cathedral in London and combined these elements together to portay unity. This amalgamation between these two photographs portrays identity as a unique and convoluted subject, as I see this fountain as a representation of Dubai's growing multiculturalism and expanding economy.
I changed the background to a layer and then placed the photograph of the fountains on top. I then faded it so that you can see the photograph underneath and then used the eraser tool to remove a bit of the top layer so that the top of St. Pauls Cathedral comes through. |
Two.
|
The second final piece is Dubai with Big Ben.
I made a new layer and then used the quick selection tool to take elements of the photograph that I want to remove of the Big Ben. I then removed the background so that there is only a photograph of just Big Ben itself. I then saved this as a photoshop file and opened the second photograph. With the second photograph, I done same thing by removing the background and saving it under a photoshop file. I then opened the same photograph of Dubai again and then placed the photograph of Big Ben on top, I moved it to where it was necessary and then placed the other photograph of Dubai on top so that there are now 3 layers. I then changed the contrast and then merged all the layer together. |
|
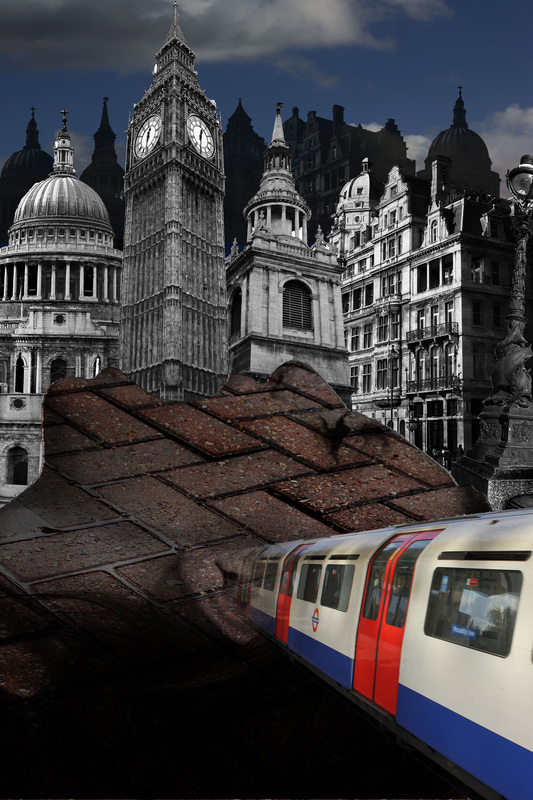
Three.
|
|
I made another layer for the photograph of an old London building like I have with the past photographs and used the quick selection tool to remove the centre of it. I then saved it as a photoshop file and placed another photograph on top of a building in Dubai. I moved that underneath so that the bulding of London is on top.
|
A04
Personal Presentation.
Present a personal,informed and meaningful response demonstrating critical understanding,realising intentions and where appropriate ,making connections between visual , written, oral or other elements.
Convergence: The combination of two societies